How To Make DIY Screen Protector: A Comprehensive Guide
Creating your own DIY screen protector is an excellent way to protect your devices while saving money. Whether you're a tech enthusiast or simply someone who wants to avoid the high cost of commercial screen protectors, this guide will walk you through every step of the process. With the right tools and techniques, you can achieve professional results at home.
In today's digital age, our devices are more important than ever. Protecting them from scratches, cracks, and other damage is crucial. While store-bought screen protectors are readily available, they can be expensive and may not always fit your device perfectly. This is where DIY screen protectors come in handy.
This article will cover everything you need to know about making your own screen protector, including materials, tools, step-by-step instructions, and tips for achieving the best results. By the end of this guide, you'll have the confidence to create a custom screen protector that fits your device perfectly.
- Lake Travis Hs Football
- Why Is Cvs Charging Me 5 A Month
- What Age Do Kittens Drink Water
- St John Bosco Schools
- Kob%C3%83 Japanese Steakhouse West 192
Table of Contents
- Introduction to DIY Screen Protectors
- Benefits of DIY Screen Protectors
- Materials You'll Need
- Essential Tools for the Job
- Preparation Steps
- Step-by-Step Guide
- Tips for Success
- Common Mistakes to Avoid
- Troubleshooting Tips
- Alternative Methods
Introduction to DIY Screen Protectors
DIY screen protectors have become increasingly popular as people look for cost-effective ways to safeguard their devices. Unlike commercial options, homemade screen protectors allow you to customize the fit and design according to your preferences. They also provide an opportunity to learn more about the technology behind screen protection.
Understanding Screen Protectors
Screen protectors are thin films or sheets applied to the surface of devices such as smartphones, tablets, and laptops. Their primary function is to shield the screen from physical damage like scratches, cracks, and fingerprints. While many people rely on store-bought options, creating your own can be just as effective.
- Elle Macpherson How Tall
- The Landing At Tiffany Springs
- The Red Grape In Sonoma
- Where Can I Buy Used Musical Instruments
- The Silver And Gold Is Mine
Why Choose DIY?
There are several reasons why DIY screen protectors are worth considering. Not only do they save money, but they also offer greater flexibility in terms of customization. Additionally, making your own screen protector can be a fun and rewarding project that enhances your understanding of device maintenance.
Benefits of DIY Screen Protectors
Making your own screen protector comes with numerous advantages. Below are some of the key benefits:
- Cost-Effective: DIY screen protectors are significantly cheaper than purchasing pre-made ones.
- Customization: You can tailor the size and shape to fit your device perfectly.
- Learning Experience: The process teaches you valuable skills about device care and maintenance.
- Environmental Impact: By using eco-friendly materials, you can reduce waste and promote sustainability.
- Immediate Availability: You don't have to wait for delivery or worry about availability in stores.
Materials You'll Need
To make a DIY screen protector, you'll need the following materials:
- Clear plastic sheet (PET or polycarbonate)
- Adhesive spray
- Microfiber cloth
- Scissors or craft knife
- Masking tape
- Isopropyl alcohol (70% or higher)
- Cotton swabs
These materials are widely available at craft stores or online retailers. Ensure you choose high-quality plastic sheets to achieve the best results.
Essential Tools for the Job
Having the right tools is crucial for a successful DIY project. Here's a list of tools you'll need:
- Ruler or measuring tape
- Pen or marker
- Lint-free cleaning wipes
- Blu-Tack or putty
- Anti-static spray (optional)
These tools will help you achieve precision and accuracy when cutting and applying the screen protector.
Preparation Steps
Before starting the process, it's essential to prepare your workspace and device properly. Follow these steps to ensure a smooth application:
1. Clean Your Device
Use a microfiber cloth and isopropyl alcohol to clean your device's screen thoroughly. This removes dust, oils, and other particles that could interfere with the adhesive.
2. Gather Your Materials
Ensure all your materials and tools are within reach. Having everything ready will make the process more efficient.
3. Create a Dust-Free Environment
Work in a clean, dust-free area to prevent particles from getting trapped under the screen protector. You can use anti-static spray to reduce static electricity.
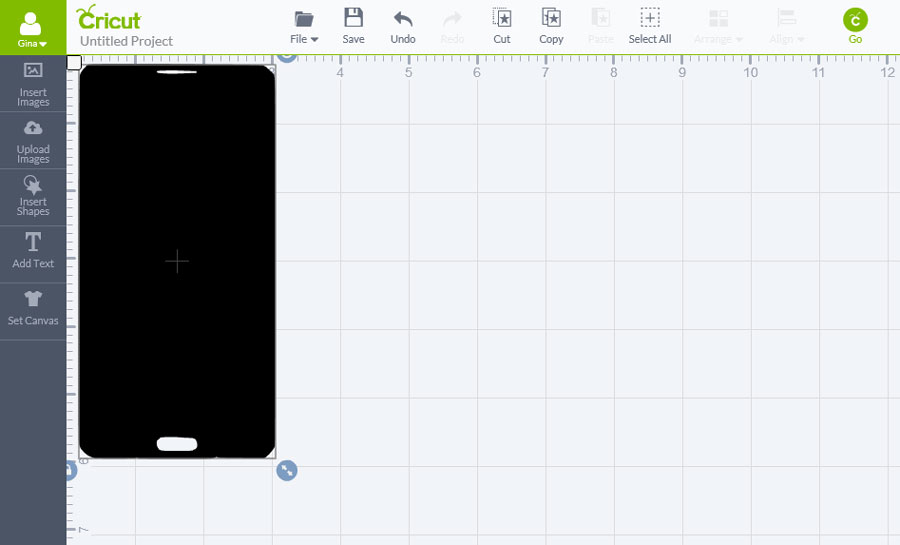
Step-by-Step Guide
Now that you're prepared, let's dive into the step-by-step process of creating your DIY screen protector:
Step 1: Measure Your Device
Use a ruler or measuring tape to measure the dimensions of your device's screen. Make sure to account for any bezels or edges.
Step 2: Cut the Plastic Sheet
Using scissors or a craft knife, carefully cut the plastic sheet to match the measurements of your device. Leave a small margin around the edges for trimming later.
Step 3: Apply Adhesive Spray
Lightly spray one side of the plastic sheet with adhesive spray. Be careful not to oversaturate, as this can cause bubbles or uneven adhesion.
Step 4: Position the Screen Protector
Align the plastic sheet with your device's screen and gently press it into place. Use masking tape to hold it steady while you work.
Step 5: Trim Excess Material
Use a craft knife to trim any excess plastic around the edges of your device. Take your time to ensure clean, precise cuts.
Tips for Success
Here are some additional tips to help you achieve the best results:
- Work slowly and carefully to avoid mistakes.
- Use Blu-Tack to lift any trapped dust particles before applying the protector.
- Apply even pressure when smoothing out the screen protector to prevent bubbles.
- Test the fit on your device before cutting the final shape.
Common Mistakes to Avoid
While DIY screen protectors are straightforward, there are a few common mistakes to watch out for:
- Using low-quality materials that may scratch or yellow over time.
- Applying the protector in a dusty environment, leading to trapped particles.
- Rushing the process, which can result in bubbles or misalignment.
Avoiding these pitfalls will help you create a professional-grade screen protector.
Troubleshooting Tips
If you encounter any issues during the process, here are some troubleshooting tips:
- Bubbles: Gently press them out with your fingers or a credit card.
- Uneven Edges: Trim again with a sharp craft knife for cleaner results.
- Adhesion Problems: Re-clean the screen and reapply the protector.
These solutions should help resolve most common problems.
Alternative Methods
While the method described above is effective, there are alternative approaches you can try:
1. Using Pre-Cut Templates
Some manufacturers offer pre-cut templates for popular devices. These can simplify the cutting process and ensure a perfect fit.
2. Liquid Glass Coating
Liquid glass coatings provide an invisible layer of protection without the need for physical films. They are easy to apply and offer excellent durability.
Kesimpulan
Making your own DIY screen protector is a cost-effective and rewarding project that offers numerous benefits. By following the steps outlined in this guide, you can achieve professional results at home. Remember to use high-quality materials, prepare your workspace thoroughly, and work carefully to avoid common mistakes.
We encourage you to share your experience in the comments below or try other DIY projects related to device maintenance. For more tips and tutorials, explore our other articles on tech and gadget care.
Take Action: Share this article with friends who might find it helpful, and don't hesitate to ask questions in the comments section!
- Give Me The Number To Cricket Wireless
- Family Care Eye Center
- Where To Get A Husky Dog
- Bj S Restaurant In Carlsbad
- What S The Capital Of Monaco
DIY Phone Screen Protector Yummi Haus
DIY Phone Screen Protector Yummi Haus
DIY Phone Screen Protector Yummi Haus
