Canning Pears In Water: A Comprehensive Guide To Preserving Freshness
Canning pears in water is a time-tested method to preserve the delicious taste and texture of this versatile fruit. Whether you're a seasoned home canner or a complete beginner, this guide will walk you through every step of the process. Learn how to safely and effectively preserve pears using water as a simple yet effective medium.
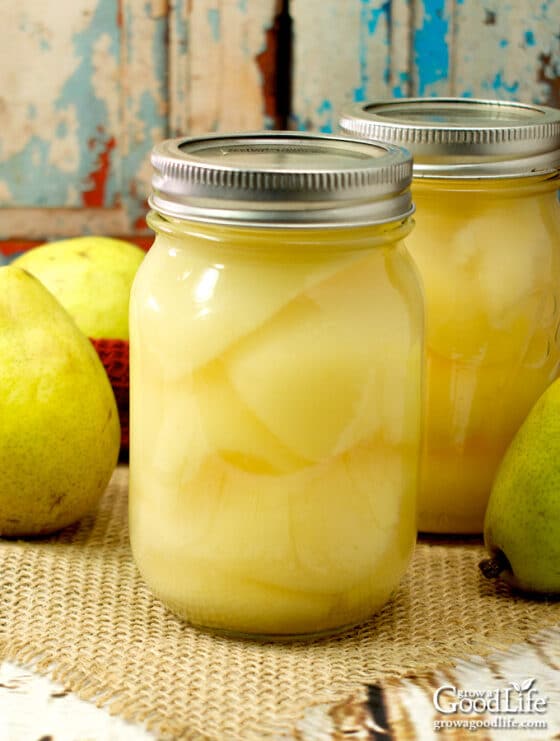
Pears are one of the most popular fruits for canning because they retain their flavor and texture when preserved properly. By using water as the preserving liquid, you can enjoy fresh, homemade canned pears all year round without the need for added sugar or syrups. This method not only keeps the fruit nutritious but also enhances its natural sweetness.
With the growing interest in home preservation techniques, learning how to can pears in water has become more relevant than ever. This guide will provide you with all the necessary information, from selecting the right pears to storing your canned goods safely. Let's dive in!
- Stores In Fashion Island
- Universal Studios Hollywood Whoville
- Elle Macpherson How Tall
- West Point Military Academy Address Zip Code
- What Cancer Did Gabe Solis Died From
Table of Contents
- Benefits of Canning Pears in Water
- Essential Equipment for Canning
- Choosing the Right Pears
- Preparing Pears for Canning
- Step-by-Step Canning Process
- Safety Tips for Canning
- Proper Storage of Canned Pears
- Variations and Additions
- Common Issues and Troubleshooting
- Frequently Asked Questions
Benefits of Canning Pears in Water
Canning pears in water offers numerous advantages that make it a preferred choice for preserving this fruit. Not only does it allow you to enjoy fresh pears throughout the year, but it also ensures that the fruit remains nutritious and free from artificial additives.
Why Choose Water Over Syrup?
Using water instead of syrup reduces the sugar content in your canned pears, making it a healthier option. Here are some key benefits:
- Lower Calorie Content: Water-based canning eliminates the need for added sugar, making it ideal for those watching their calorie intake.
- Natural Flavor: Pears canned in water retain their natural sweetness and flavor without being overwhelmed by syrup.
- Versatility: Canned pears in water can be used in a variety of recipes, from desserts to savory dishes, without altering the dish's taste profile.
Essential Equipment for Canning
To successfully can pears in water, you'll need the right equipment. Having the proper tools ensures that the process is both safe and efficient. Here's a list of essential items:
- What S The Capital Of Monaco
- St John Bosco Schools
- Donde Esta La Ingle De La Mujer
- Las Vegas Hotel Mgm Grand Pictures
- Doubletree Hotel International Drive Orlando Fl
- Large pot with a lid
- Canning jars with lids and bands
- Canning funnel
- Jar lifter
- Magnetic lid lifter
- Large saucepan for preparing water
- Vegetable peeler
- Knife and cutting board
- Timer
Investing in quality canning equipment will make the process smoother and help prevent contamination.
Choosing the Right Pears
Selecting the right type of pears is crucial for successful canning. Not all varieties are suitable for preserving, so it's important to choose ones that hold up well during the process.
Best Pear Varieties for Canning
Bosc, Anjou, and Bartlett pears are among the best choices for canning. These varieties have firm flesh that doesn't break down easily when cooked. Here are some tips for selecting the perfect pears:
- Firmness: Choose pears that are slightly underripe but not hard. They should give slightly when pressed.
- Color: Look for pears with even coloring and no bruises or soft spots.
- Size: Medium-sized pears are easier to handle and fit better into jars.
Preparing Pears for Canning
Proper preparation is key to achieving the best results when canning pears in water. Follow these steps to ensure your pears are ready for preservation:
Step 1: Wash and Peel the Pears
Rinse the pears thoroughly under running water to remove any dirt or debris. Use a vegetable peeler to remove the skin, as this will help the pears absorb the water more effectively.
Step 2: Cut and Core the Pears
Cut the pears into halves or quarters, depending on your preference. Remove the core and seeds carefully. To prevent browning, soak the pears in a solution of water and lemon juice for about 10 minutes.
Step-by-Step Canning Process
Now that your pears are prepared, it's time to start the canning process. Follow these detailed steps:
Step 1: Sterilize the Jars
Wash the jars, lids, and bands in hot, soapy water. Rinse them thoroughly and place them in a large pot of boiling water for 10 minutes to sterilize. Keep the jars warm until ready to use.
Step 2: Prepare the Water
In a large saucepan, bring water to a boil. You can also add a splash of lemon juice to enhance the flavor and prevent discoloration.
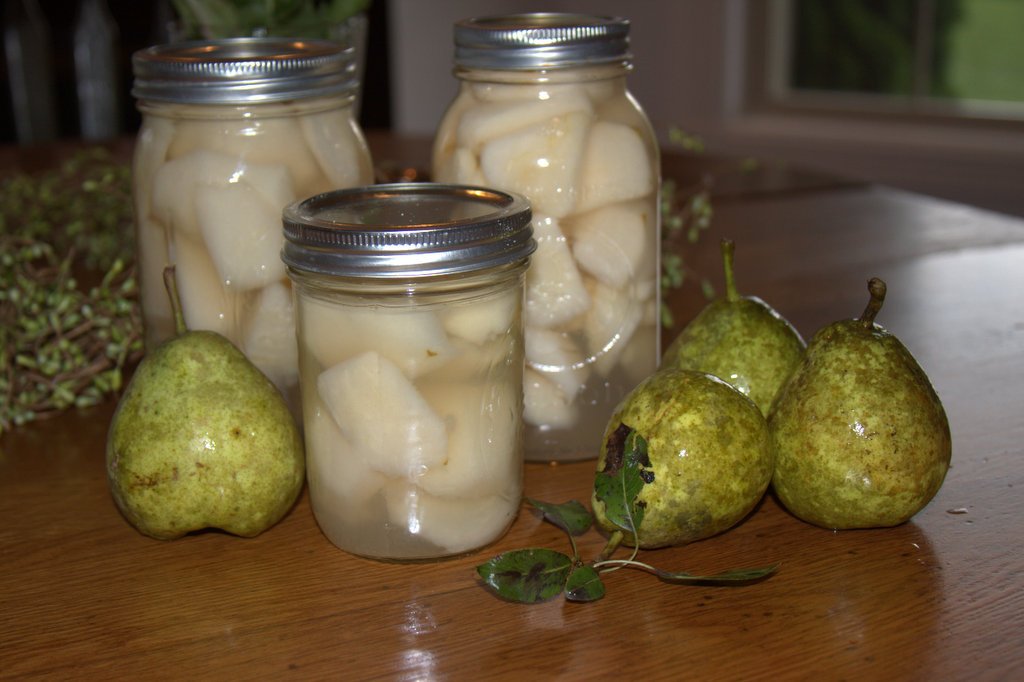
Step 3: Pack the Jars
Using a canning funnel, carefully pack the prepared pears into the sterilized jars. Leave about 1/2 inch of headspace at the top. Pour the hot water over the pears, ensuring they are fully submerged.
Step 4: Seal and Process
Wipe the rims of the jars with a clean, damp cloth. Place the lids on top and secure with the bands. Process the jars in a boiling water bath for 20-25 minutes, depending on your altitude.
Safety Tips for Canning
Safety should always be a top priority when canning. Here are some important tips to keep in mind:
- Always use fresh, high-quality ingredients.
- Ensure all equipment is clean and sterilized before use.
- Follow processing times carefully to prevent contamination.
- Store canned goods in a cool, dry place away from direct sunlight.
Proper Storage of Canned Pears
Once your canned pears are processed, it's important to store them properly to maintain their quality. Here are some storage guidelines:
- Allow the jars to cool completely before storing.
- Check the seals on each jar to ensure they are airtight.
- Label each jar with the date and contents for easy identification.
- Store the jars in a cool, dark place, such as a pantry or basement.
Variations and Additions
While canning pears in water is a simple and effective method, there are several variations you can try to add extra flavor:
Additions to Enhance Flavor
- Cinnamon: Add a stick of cinnamon to each jar for a warm, spicy flavor.
- Vanilla: Drop a vanilla bean into the water for a rich, aromatic taste.
- Lemon Zest: Include a bit of lemon zest to brighten the flavor profile.
Common Issues and Troubleshooting
Even with careful preparation, issues can arise during the canning process. Here are some common problems and solutions:
Problem: Pears Float to the Top
Solution: Gently tap the jars on a flat surface to release any air bubbles. Ensure the pears are fully submerged in water before sealing.
Problem: Seals Fail
Solution: Double-check the seals after processing. If a jar fails to seal, refrigerate it and use within a few days.
Frequently Asked Questions
Q: Can I use frozen pears for canning?
A: It's best to use fresh, firm pears for canning. Frozen pears may become too soft during the process.
Q: How long do canned pears last?
A: Properly canned pears can last up to one year when stored in a cool, dark place. Always check for signs of spoilage before consuming.
Q: Can I use a pressure canner instead of a water bath?
A: While a pressure canner is an option, a water bath is sufficient for canning pears in water. It's simpler and just as effective.
Conclusion
Canning pears in water is a rewarding and practical way to preserve this delicious fruit. By following the steps outlined in this guide, you can enjoy fresh, homemade canned pears all year round. Remember to always prioritize safety and use high-quality ingredients for the best results.
We encourage you to try this method and share your experience with us in the comments below. Feel free to explore our other articles on home canning and preservation techniques. Happy canning!
- Stores In Fashion Island
- Jt Orthodontics El Paso Tx
- How To Install Outside Water Spigot
- Woodinville Department Of Licensing
- Train Ride Virginia City Nv
Canning Pears for Food Storage

Almond Pears Home Canning Recipe One Hundred Dollars a Month
Canning your Own Pears without Sugar Recipes We Love
